Due to changes in the Instagram API, Instagram Multifeeder is no longer supported.
Easily add your brand’s Instagram feed to Shopify with Instagram Multifeeder.
The Instagram Multifeeder app makes it easy to add one or more Instagram feeds to your Shopify store - from more than one Instagram account.
The ideal solution for brands and marketers who need to add posts from more than one Instagram feed to a Shopify store, Instagram Multifeeder seamlessly syncs your Instagram Feeds to your website.
Within each feed, only post content you want to share. Instagram Multifeeder lets you filter out content you don’t want on your site using hashtags on your post. And stay on brand by customizing the look + feel of your feed, with post count, padding, and and more.
Getting Started
To add an Instagram feed to your page you need to complete three steps:
1. Register an Instagram app on your account (5 minutes);
2. Add the IGM app to your Shopify Store (1 minute);
3. Create and place a feed on your store (5 minutes).
Your Instagram feed will be added to your store with a simple HTML tag using the online editor in Shopify, so some comfort with HTML is helpful. This post will walk you through the steps to get your Instagram feed up and running on your store.
In order to add a feed to your store you will need some working knowledge of HTML, and an account that gives you access to edit your Shopify pages and theme.
Before you begin: Make sure Instagram Multifeeder is installed on your Shopify store.
STEP 1: Get an Instagram Access Token
In order to connect your Instagram account to your Shopify store, you will need to generate an access token to grant Instagram Multifeeder access to your account. The access token will be used to grab your Instagram feed and display it on your site. Each Instagram feed you would like to include on your store will need its own Instagram access token. Follow the steps below to generate an Instagram access token to include on your store:
1. Sign into your Instagram account as a developer
To generate an access token, you must first register as an Instagram developer. Create an account or log into your Instagram account with your regular username and password through the Instagram developer page. Fill out the Developer Signup form with your website, phone number, and what you want to build with the API. You can use your shopify store URL here, and say that you want to put your Instagram feed on your website. Accept the API Terms of Use and Brand Guidelines, and click the 'Sign up' button. You will be redirected to the Developer Documentation page.
Login to Instagram and access the Developer page (https://www.instagram.com/developer/). Click ‘Register Your Application’ to begin the process.
Next, fill out the Developer Signup form with your website, phone number, and what you want to build with the API.
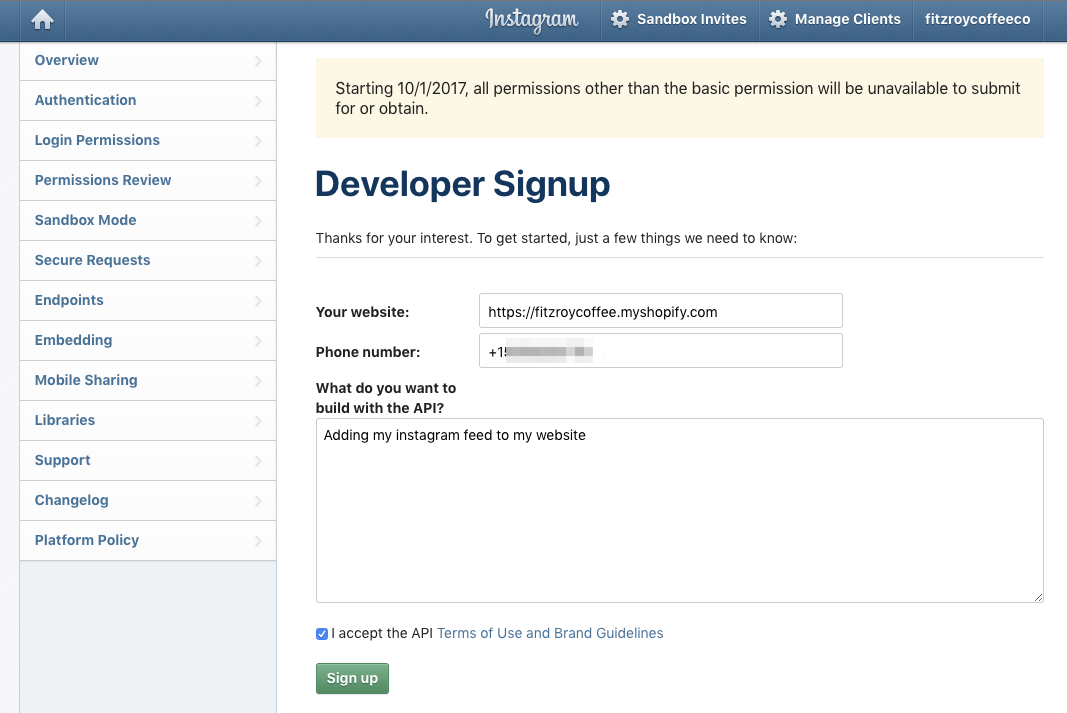
You can use your shopify store URL here, your business phone number, and add a message such as ‘Adding my instagram feed to my website’. Then, accept the API Terms of Use and Brand Guidelines, and click the 'Sign up' button. You will be redirected to the Developer Documentation page.
2. Register a new Client ID
Once you register your developer account you will need to click the ‘Register Your Application’ to continue the process.
Now you will be asked to ‘Register a New Client’:

Instagram will notify you that you don’t have any registered clients and will offer you to create a new one (green button).
The next page has 4 required fields, so be attentive!
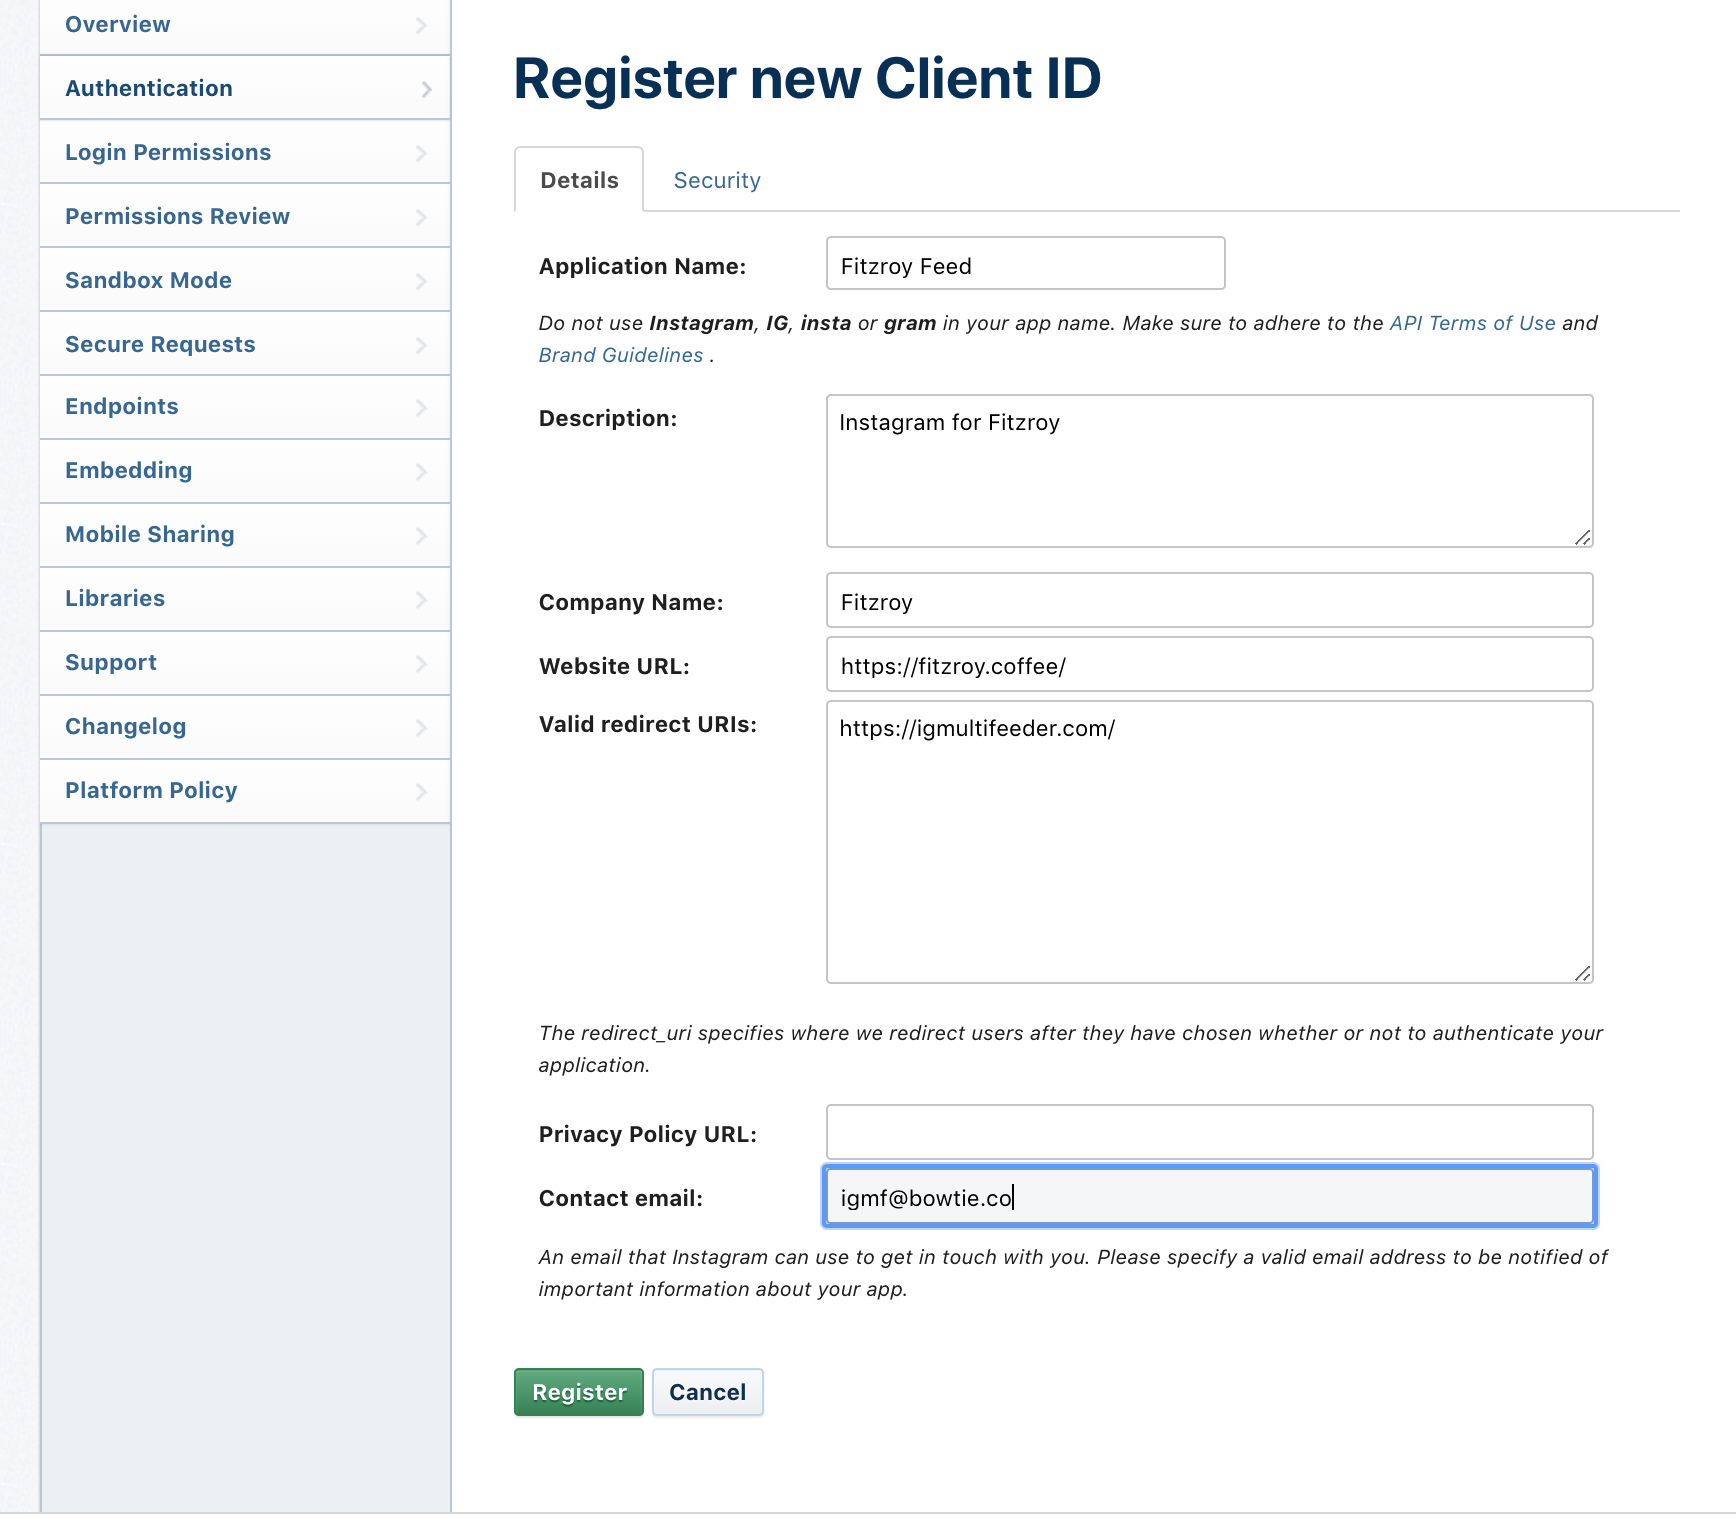
You will be asked to fill out your Application Name, description, Website URL, and valid redirect URI.
Choose any appropriate name for your app, such as 'My Store Feed', and any short description.
If you use the Instagram Multifeeder token generator to create your Instagram token, the ‘website URL’ and ‘valid redirect URI’ must be https://igmultifeeder.com/token/
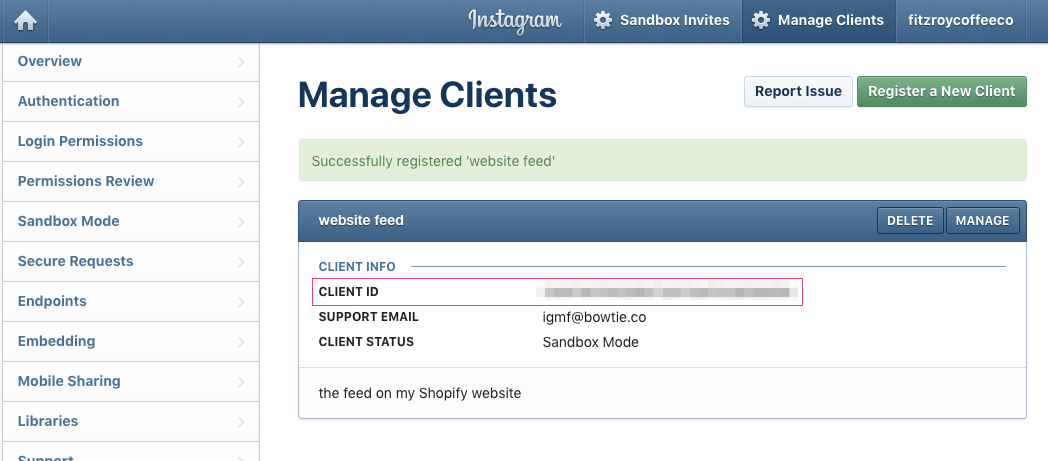
Now, double check your entries and click the ‘Register’ button once you have finished filling out the form, and you will be redirected to a page which will show you your Client ID - which we need to bring into the Instagram Multifeeder App via the Shopify Admin UI.
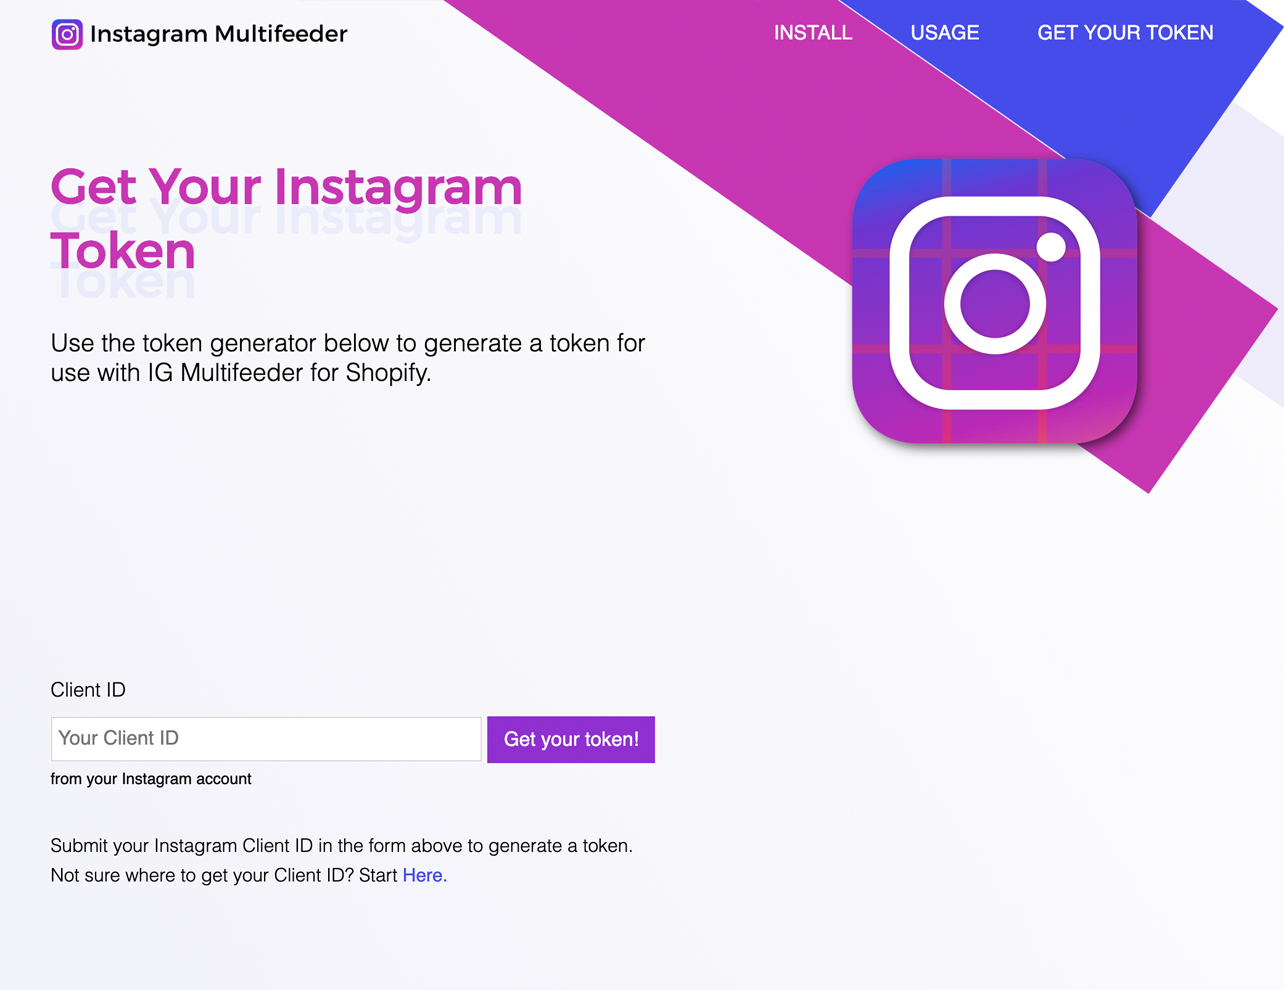
4. Generate Instagram Access Token using your Client ID
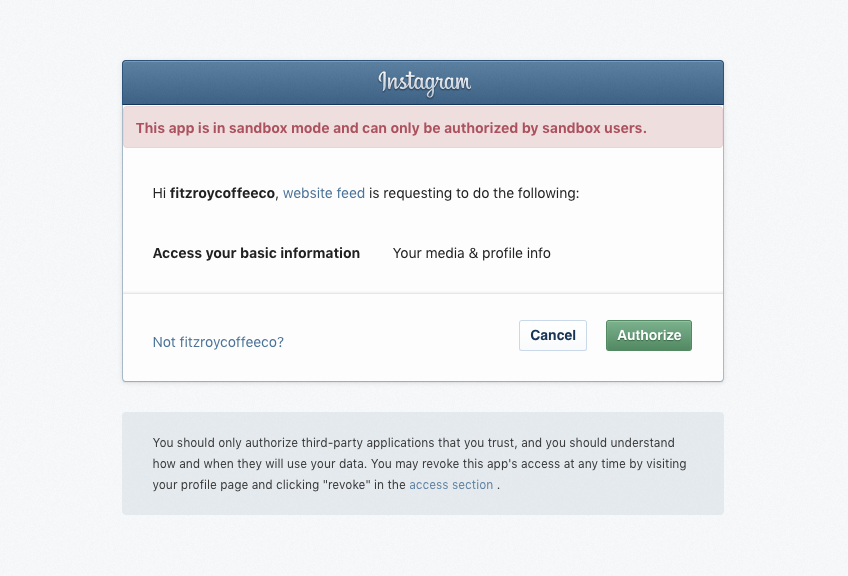
Copy the Client ID that you have registered and paste it in the Instagram Access Token generator, here. Click the ‘Get Instagram Access Token’ button and you will be taken to a page where you will Authorize your app to access your profile photos.
On the next page, copy the Instagram access token that has been generated for you. You are now ready to add your Instagram feed for your store!
Note: Your instagram access token only allows the Instagram Multifeed app to access and display your photos. It does not grant any access to your personal data or allow for making any action in your name.
STEP 2: Adding a Feed
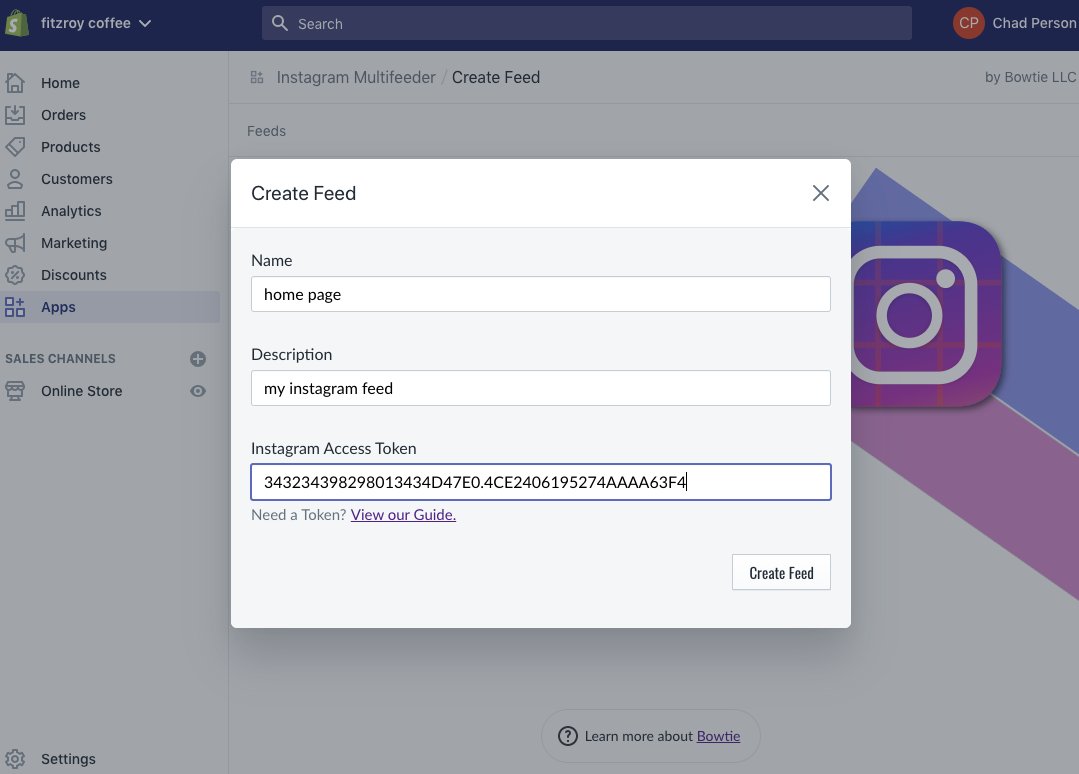
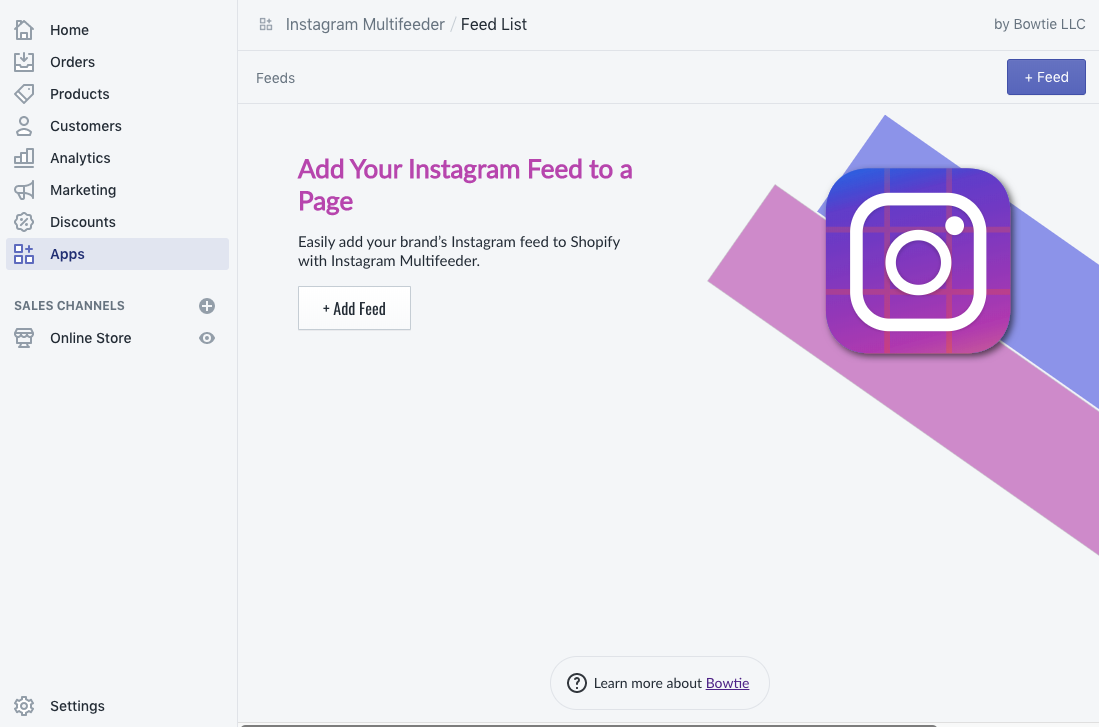
To create your first feed, click on the '+ Add Feed' button on the app's main page.
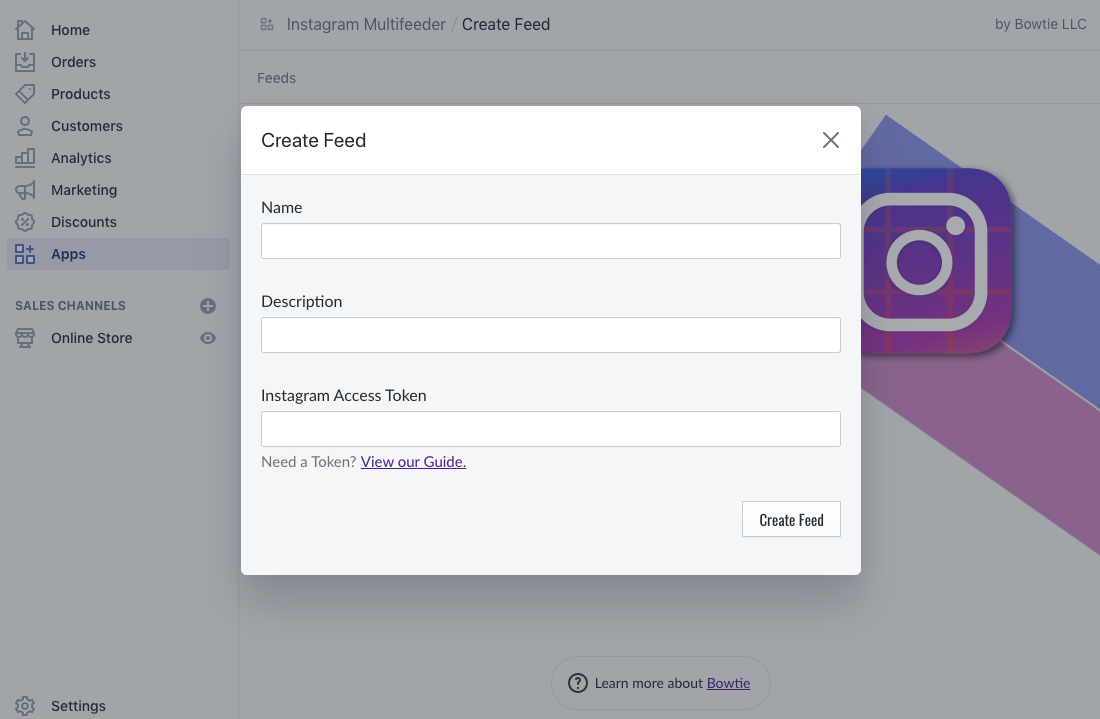
Enter the name of your feed, a description, and the Instagram access token and click the 'Create Feed' button. The name and description of your feed will not be displayed in your store, rather it is simply for you to be able to differentiate between feeds.
Once you have created a feed, you will be redirected to the Edit Feed page.
Editing a Feed
From the Edit Feed page, you can change the instagram access token, see the feed's HTML tag to copy and insert in your Shopify store theme, and configure your feed.
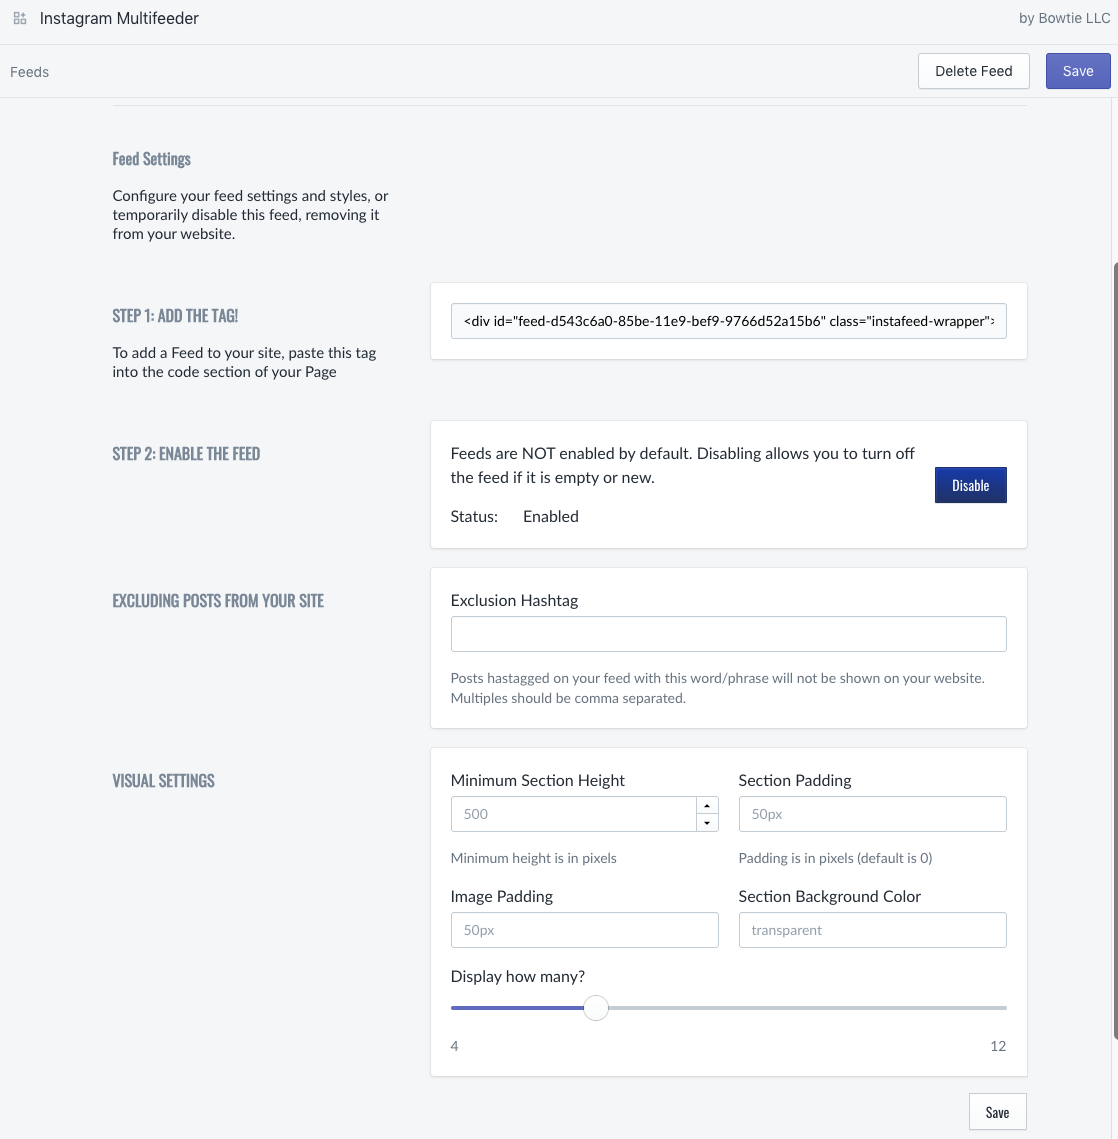
Make sure you click the 'Enable' button for your feed to show on your store, as all feeds are disabled by default.
You may also wish to include an Exclusion Hashtag. Posts marked with this hashtag will not be shown in the feed on your store.
Visual Settings
You can customize the appearance of your feed in the Visual Settings section on the Edit Feeds page.
The Minimum Section Height controls the minimum size of the photos in your feed, in pixels. This ensures that when customers view your shop in different sized browsers, the photos in your feed will adjust to the size of their browser window, and will be no smaller than the minimum height you specify.
Section Padding determines how much space your feed puts between it and other content in your store, also in pixels. A smaller section padding value indicates less space between other content and the feed, with zero being no space at all, and a larger section padding value indicates more space. Likewise, the Image Padding parameter determines how much space there is between respective photos in your feed.
You can also change the background color of your feed with Section Color. This color will show behind your photos and extend to the minimum section height you've specified. The default background color for feeds is transparent. You may choose a color from the color picker by clicking the field and dragging the slider to the color you desire, or you may paste an rgba value into the field.
The ‘Display how many?’ slider at the bottom of the Visual Settings section determines how many pictures from your feed to show, from two to twelve. Pictures will be shown in chronological order, as they appear on your profile on Instagram.
Once you have configured the settings of the feed to your liking, click the Save button to update your feed. To return to the main page of the app, click 'Feeds' in the top left hand corner. You will now see a list of your feeds. If you wish to edit or delete your feed at any time, navigate to the Feed List page and click the 'Edit' button next to the feed you wish to edit or delete.
Paste the HTML Tag
Either you or your developer should open up your store's theme code and paste the HTML tag associated with your feed found on the Edit Feed page. The HTML tag can be placed anywhere within your code. Each instagram feed will have its own unique HTML tag, allowing you to add as many as you like in your store.
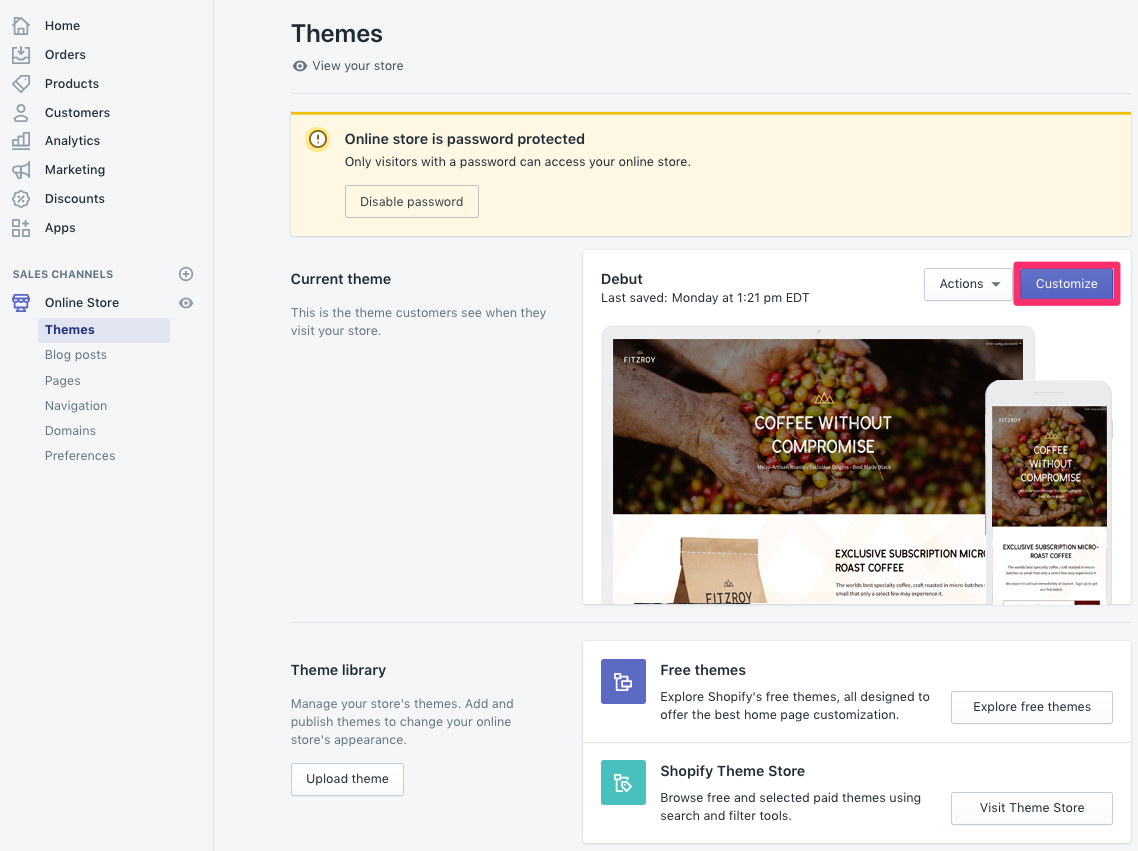
To add the HTML tag to your shop theme, log into your development store. On the sidebar, click ‘Online Store’ under the ‘Sales Channels’ section and select ‘Themes’. This will bring you to your store’s theme page, and show you the current theme. Click the ‘Customize’ button to open up the theme customization menu.
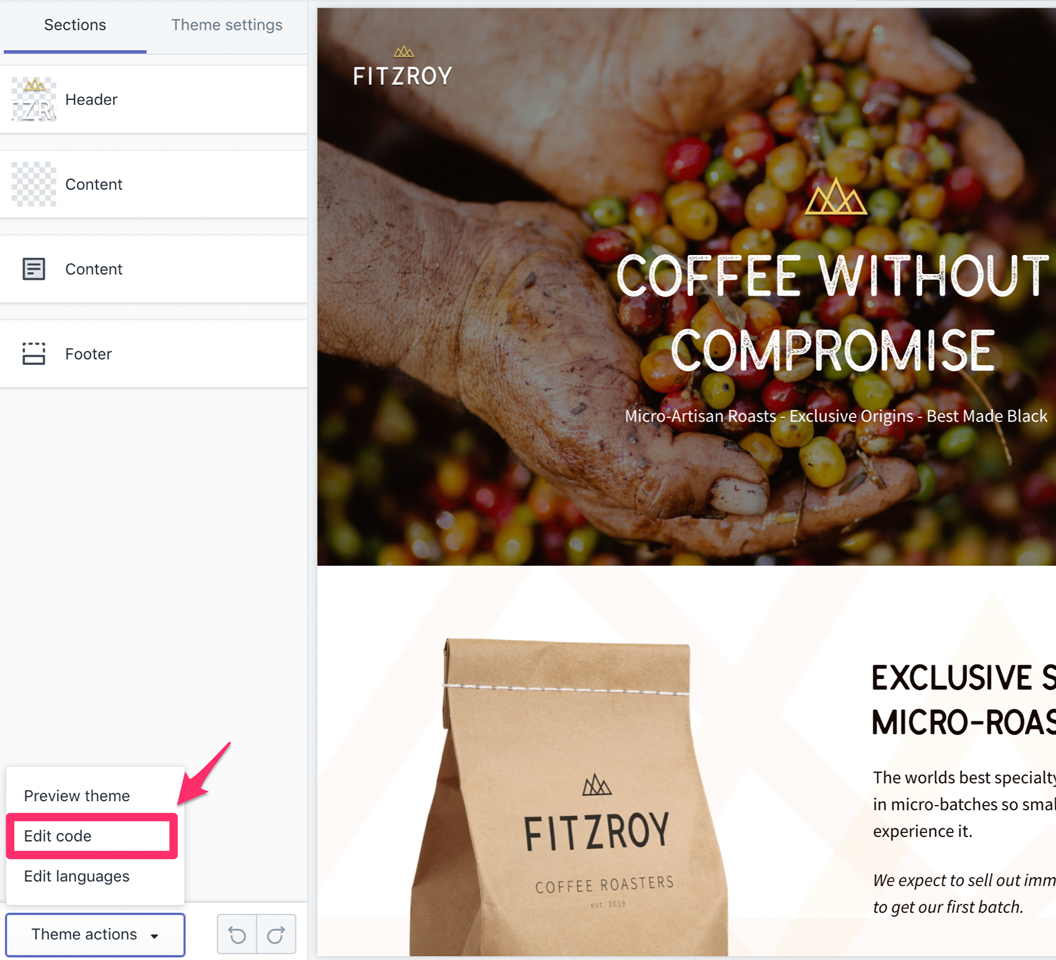
In the customize theme menu you will see a preview of your shop’s theme and customization options. Press the ‘Theme actions’ button in the bottom of the sidebar. Select Edit code, which will bring you to the theme’s code editor.
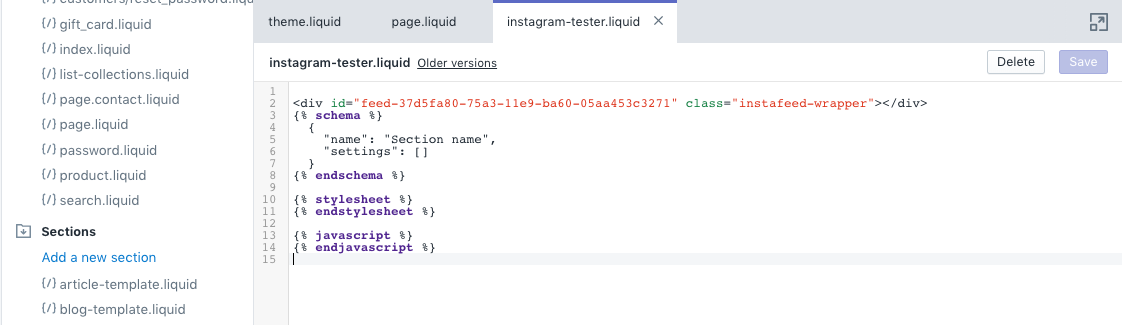
Create a new section in under ‘Sections’ in the sidebar. Give it a name, and copy your feed’s HTML tag into it, along with any theme-specific code used to include it in your theme. For example:
<div id="feed-37d5fa80-75a3-11e9-ba60-05aa453c3271" class="instafeed-wrapper"></div>
Be sure to save when you are done, and then go to your theme.liquid under ‘Layouts’ in the sidebar. You may insert your instagram-tester.liquid reference anywhere in your theme. In the example below, the Instagram feed will appear just below the header:

Save your theme.liquid after you’ve placed your Instagram feed in the location of your choosing.
Congratulations! You should now see your Instagram feed(s) on your store.
Troubleshooting
Not seeing your Instagram feed in your theme? These steps will help you troubleshoot the problem.
- Is ‘https://igmultifeeder.com/token/’ whitelisted on the Instagram Developer console?
- Double check that the provided html element is installed and saved on the theme.
- Double check that ‘Enabled’ has been selected from the settings within the app.
- Ensure the linked Instagram account has at least as many images as the amount selected on the ‘Image Limit’ range slider in settings.